Code First is the third (and newest) way to define your Microsoft ADO.NET Entity Framework Entity Data Model. Originally introduced as part of Entity Framework 4.1 (released in April 2011), Code First provides an alternative to Database First or Model First design, allowing you to define your domain model and in turn create your database by writing your entity classes first.
With Database First or Model First design, you could choose between using automatically generated entity classes that inherit from Entity Framework’s EntityObject, POCO (Plain Old CLR Objects) entity classes generated from a specialized code generation template, or your own POCO entity classes by disabling automatic code generation. If you disabled automatic code generation, the XML-based EDMX file and your POCO entity classes had to be kept in synch as you made changes to the model. With Code First, you no longer have to maintain the EDMX file using the ADO.NET Entity Data Model Designer, as Entity Framework generates the in-memory metadata that describes your model from your code. This means less work for developers who want to use their own POCO entity classes.
While you can use Code First with an existing database, one of the most interesting features of Code First is its ability to generate a new database. Unsurprisingly, developers are quick to dismiss the idea of generating an application’s database from code (we all have been burned before by the promise of a tool automatically generating a part of an application). In practice, I have found Code First to be an efficient and flexible way to create your application’s database.
This blog post will provide a walkthrough in setting up a data layer using Entity Framework Code First. This data layer will eventually be used by a web site, cleverly named Calorie Counter, which will allow users to count calories and track their weight on a daily basis.
Getting Started
Let’s get started by setting up our Visual Studio projects. I’ll be using Visual Studio 2012, but you can also use Visual Studio 2010 if you haven’t gotten around to installing the latest version.
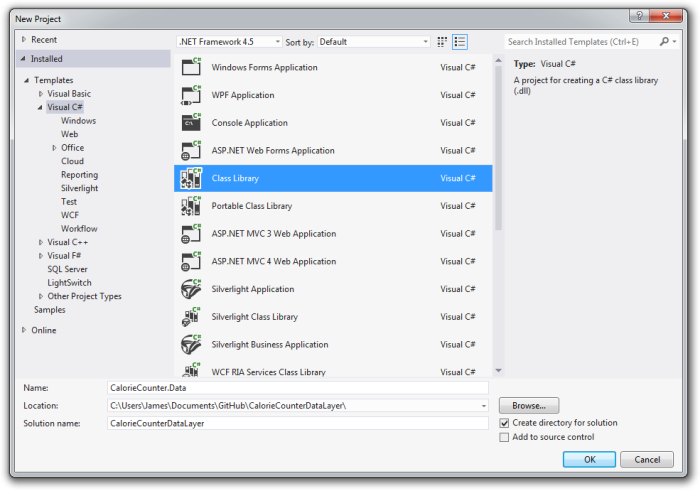
1. From within Visual Studio, use the New Project dialog (select “File > New > Project…”) to setup a new Class Library project named “CalorieCounter.Data” with a Solution name of “CalorieCounterDataLayer”.
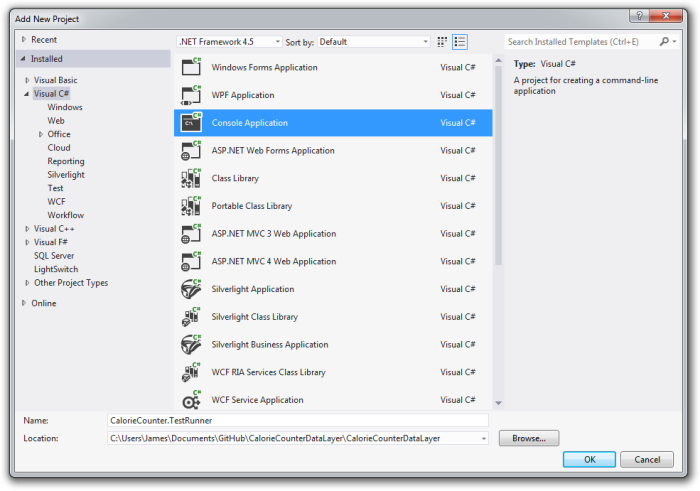
2. Using the Solution Explorer pane, open the Add New Project dialog (right click on the CalorieCounterDataLayer solution and select “Add > New Project…”) to setup a Console Application project named “CalorieCounter.TestRunner”.
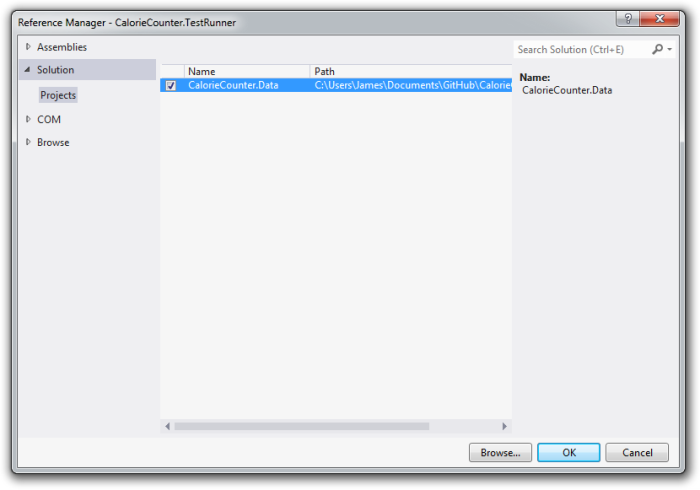
3. From within the CalorieCounter.TestRunner project in the Solution Explorer pane, open the Reference Manager dialog (right click on “References” and select “Add Reference…”) and add a reference to the CalorieCounter.Data project.
4. Delete the Class1.cs file from the CalorieCounter.Data project.
5. Add a new folder to the CalorieCounter.Data project named “Entities”.
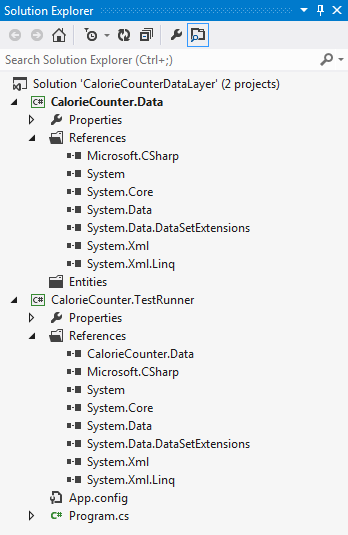
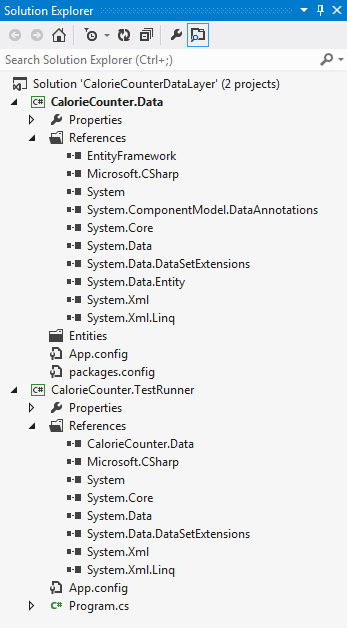
At this point, your Solution should look like this in the Solution Explorer:
Using NuGet to Add a Reference to Entity Framework
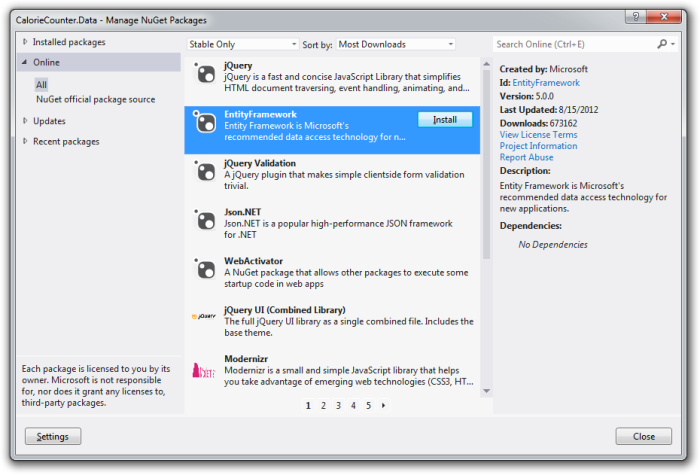
To complete our initial project setup, we’ll use NuGet to add a reference to the Entity Framework library (see http://nuget.org/ for information on installing and using NuGet). Open the Manage NuGet Packages dialog (from within the Solution Explorer, right click on the CalorieCounter.Data project and select “Manage NuGet Packages…”) and select “Online” as the packages source. If you are sorting by the most downloads, Entity Framework should be near the top of the list (at the time of this writing, it’s the second most downloaded item). Select it in the list and click “Install”. You’ll be prompted to accept a license agreement, after which the package manager will add a number of references to your project (EntityFramework, System.ComponentModel.DataAnnotations, and System.Data.Entity) and two files to the root of the project (App.config and packages.config).
Here’s an updated look at your Solution:
Defining Our Model
The first step in defining our Entity Data Model is to setup our entity classes. These classes are just regular classes or POCOs (Plain Old CLR Objects).
Here’s a list of the classes that we are going to setup with a brief description for each:
- DailyTarget – Represents the user’s daily calorie target
- FoodItem – Represents a food item that a user has consumed
- LogEntry – Represents a log entry for a specific user
- LogEntryFoodItem – Represents a log entry food item
- MealType – Represents a meal type (i.e. breakfast, lunch, dinner, etc.)
- User – Represents a user in our application
- UserWeight – Represents a user’s weight at a given point in time (typically daily)
Using the Solution Explorer, add a class for each to the CalorieCounter.Data project’s “Entities” folder. Here’s the code for each of the classes:
public class DailyTarget
{
    public int DailyTargetID { get; set; }
    public int UserID { get; set; }
    public int Calories { get; set; }
    public DateTime? DateUTC { get; set; }

    public User User { get; set; }
}

public class FoodItem
{
    public int FoodItemID { get; set; }
    public int? UserID { get; set; }
    public string Name { get; set; }
    public string ServingSize { get; set; }
    public int? Calories { get; set; }

    public User User { get; set; }
}

public class LogEntry
{
    public LogEntry()
    {
        LogEntryFoodItems = new List<LogEntryFoodItem>();
    }

    public int LogEntryID { get; set; }
    public int UserID { get; set; }
    public int MealTypeID { get; set; }
    public DateTime DateTimeUTC { get; set; }

    public MealType MealType { get; set; }
    public List<LogEntryFoodItem> LogEntryFoodItems { get; set; }
}

public class LogEntryFoodItem
{
    public int LogEntryFoodItemID { get; set; }
    public int LogEntryID { get; set; }
    public int FoodItemID { get; set; }
    public decimal Serving { get; set; }

    public LogEntry LogEntry { get; set; }
    public FoodItem FoodItem { get; set; }
}

public class MealType
{
    public int MealTypeID { get; set; }
    public string Name { get; set; }
}

public class User
{
    public User()
    {
        Weights = new List<UserWeight>();
        DailyTargets = new List<DailyTarget>();
        FoodItems = new List<FoodItem>();
        LogEntries = new List<LogEntry>();
    }

    public int UserID { get; set; }
    public string Username { get; set; }
    public string Name { get; set; }
    public string Email { get; set; }

    public List<UserWeight> Weights { get; set; }
    public List<DailyTarget> DailyTargets { get; set; }
    public List<FoodItem> FoodItems { get; set; }
    public List<LogEntry> LogEntries { get; set; }
}

public class UserWeight
{
    public int UserWeightID { get; set; }
    public int UserID { get; set; }
    public decimal Weight { get; set; }
    public DateTime DateUTC { get; set; }

    public User User { get; set; }
}
The Context and Repository Classes
The entity classes on their own are not enough for Entity Framework Code First to create our model and database. In order to communicate our intentions to Entity Framework, we’ll setup a Context class that inherits from DbContext (a new and improved version of Entity Framework’s ObjectContext class). The Context class will contain a DbSet property for each entity that we intend to run queries against.
We’ll also setup a Repository class which will contain all of our queries. For now, we’ll have just two public methods: GetUsers() and AddUser().
Using the Solution Explorer, add the Context and Repository classes to the CalorieCounter.Data project’s root folder. Here’s the code for each of these classes:
internal class Context : DbContext
{
    public DbSet<DailyTarget> DailyTargets { get; set; }
    public DbSet<FoodItem> FoodItems { get; set; }
    public DbSet<LogEntry> LogEntries { get; set; }
    public DbSet<MealType> MealTypes { get; set; }
    public DbSet<User> Users { get; set; }
    public DbSet<UserWeight> UserWeights { get; set; }
}

public class Repository : IDisposable
{
    private Context _context;

    public Repository()
    {
        _context = new Context();
    }

    public List<User> GetUsers()
    {
        return _context.Users.ToList();
    }
    public void AddUser(User user)
    {
        _context.Users.Add(user);
        _context.SaveChanges();
    }

    // TODO write other queries

    public void Dispose()
    {
        _context.Dispose();
    }
}
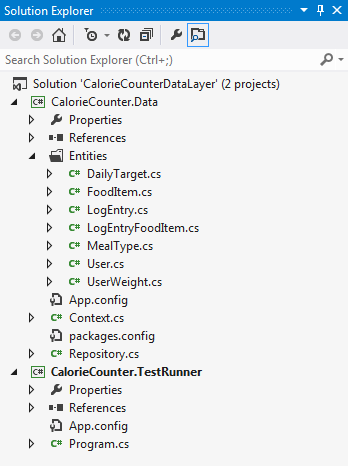
Here’s an updated look at your Solution:
Generating the Database
With the entity, context, and repository classes in place, we are ready to generate the database. To do so, we need to add a little bit of code to the CalorieCounter.TestRunner Program.cs file:
class Program
{
    static void Main(string[] args)
    {
        var repository = new Repository();
        var users = repository.GetUsers();
        users.ForEach(u => Console.WriteLine("UserID: {0}", u.UserID));
        Console.WriteLine("Number of Users: {0}", users.Count);

        Console.WriteLine("Press Enter to continue");
        Console.Read();
    }
}
We just instantiate a Repository object, call the GetUsers() method, and write each user’s ID and the number of users to the console. Make sure that the CalorieCounter.TestRunner is the startup project (from the Solution Explorer, right click on the CalorieCounter.TestRunner project and select “Set as StartUp Project”) and press F5 to debug the application.
Here’s what you should see:
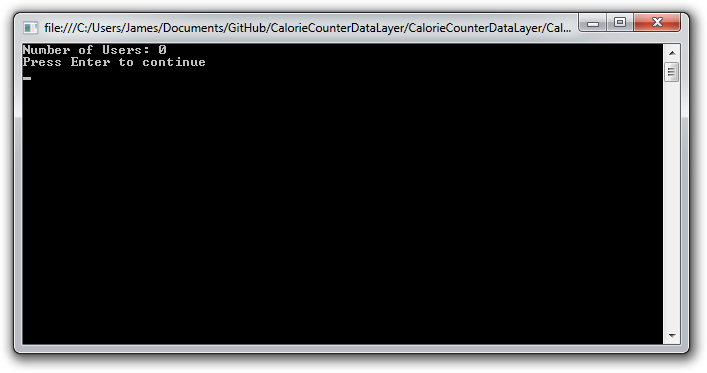
The number of users is currently “0”, which is not a surprise because we haven’t added any records to our database yet. But did the database get generated? And if so, where?
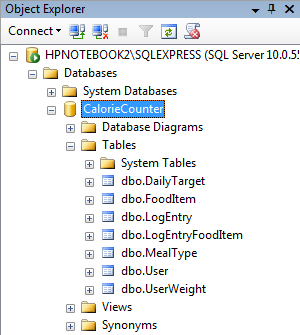
By default, Code First will create a database in the SQL Server Express instance, using the fully qualified name of our Context class, CalorieCounter.Data.Context, as the database name. Here’s a look from within SQL Server Management Studio (SSMS) at the tables that were created:
While the design of the database is far from perfect (we’ll fix those issues in a minute), the database itself is fully functional and ready to be used. To prove this point, let’s update the Program class add two users prior to retrieving and outputting the list of users:
class Program
{
    static void Main(string[] args)
    {
        var repository = new Repository();

        repository.AddUser(new User()
        {
            Username = "user1",
            Name = "John Smith",
            Email = "john@smith.com"
        });
        repository.AddUser(new User()
        {
            Username = "user2",
            Name = "Jane Doe",
            Email = "jane@doe.com"
        });

        var users = repository.GetUsers();
        users.ForEach(u => Console.WriteLine("UserID: {0}", u.UserID));
        Console.WriteLine("Number of Users: {0}", users.Count);

        Console.WriteLine("Press Enter to continue");
        Console.Read();
    }
}
Now, rerun the application by pressing F5. Here’s what you should see:
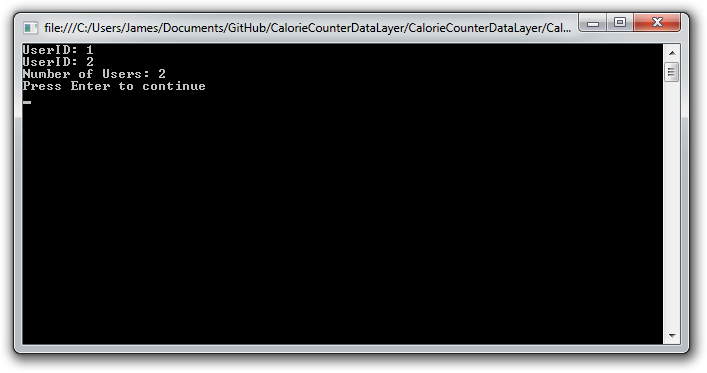
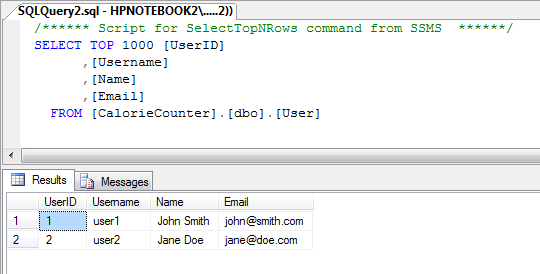
Here’s what the Users data looks like from within SSMS:
Overriding the Database Name and Location Defaults
Let’s start the database refinement process by overriding the Code First defaults for the database name and location. We’ll accomplish that by adding a connection string to the console application’s App.config file. Here’s what the App.config file should look like:
<?xml version="1.0" encoding="utf-8" ?>
<configuration>
    <startup>
        <supportedRuntime version="v4.0" sku=".NETFramework,Version=v4.5" />
    </startup>
    <connectionStrings>
        <add name="Context" providerName="System.Data.SqlClient" connectionString="Server=.\SQLEXPRESS;Database=CalorieCounter;Trusted_Connection=true"/>
    </connectionStrings>
</configuration>
I’ve specified SQLEXPRESS as the database instance name (this could be the name of any SQL Server instance that exists in your development environment) and the database name as “CalorieCounter”. Now, rerun the application by pressing F5. Once the console application successfully runs, you’ll have a new instance of the database, named “CalorieCounter”, located within the instance that you specified in the connection string.
Notice that we didn’t have to tell Entity Framework what connection to use. This was possible because we gave our connection string the same name as our context class, “Context”. Alternatively, we could update our Context class to explicitly specify the name of the connection string to use by adding a call into the DbContext’s constructor, like this:
internal class Context : DbContext
{
    public Context() : base("name=CalorieCounterContext")
    {
    }

    public DbSet<DailyTarget> DailyTargets { get; set; }
    public DbSet<FoodItem> FoodItems { get; set; }
    public DbSet<LogEntry> LogEntries { get; set; }
    public DbSet<MealType> MealTypes { get; set; }
    public DbSet<User> Users { get; set; }
    public DbSet<UserWeight> UserWeights { get; set; }
}
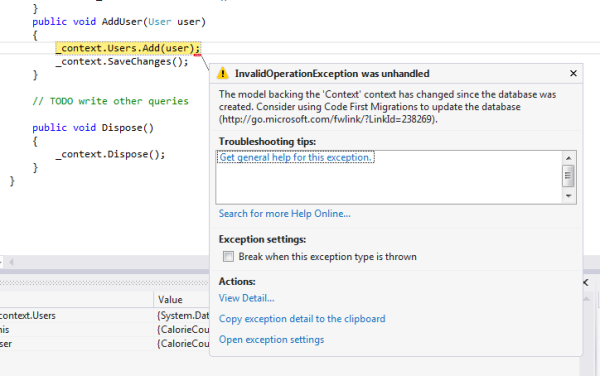
If we rerun the application, we’ll see this exception:
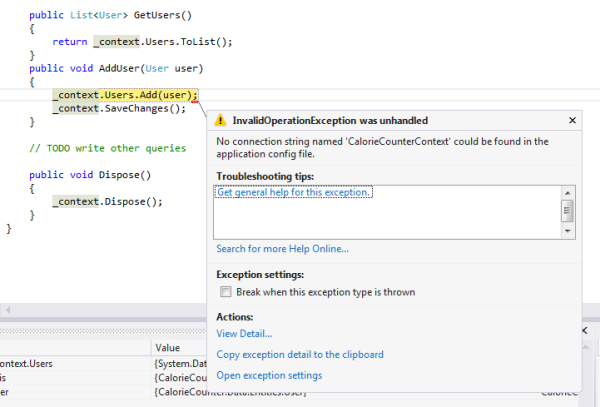
This occurred because Entity Framework was expecting to find a connection string named “CalorieCounterContext” while our connection string is still named “Context”. If we change the name of our connection string to “CalorieCounterContext” and rerun the application, the application will successfully run.
Before continuing with our database refinement process, let’s do one small bit of house cleaning. When we used NuGet to add an Entity Framework reference to the CalorieCounter.Data Class Library project, it added an App.config file that isn’t being used. Go ahead and delete the App.config file that is located in the CalorieCounter.Data project’s root.
Refining the Data Model
Now let’s turn our attention to refining the database tables themselves. Entity Framework accurately identified all of the necessary tables for our database as well as the primary keys for each. This was possible because we defined a property within each class that followed the naming convention of {ClassName}ID (we also could have just simply named our properties “ID”, but I prefer the more verbose approach).
Entity Framework arrived at the names of the tables by pluralizing the class names using the PluralizationService class (System.Data.Entity.Design.PluralizationServices.PluralizationService). You can disable this behavior by overriding the OnModelCreating() method in the DbContext class and removing the PluralizingTableNameConvention from the DbModelBuilder’s Conventions collection, like this:
internal class Context : DbContext
{
    public Context() : base("name=CalorieCounterContext")
    {
    }

    public DbSet<DailyTarget> DailyTargets { get; set; }
    public DbSet<FoodItem> FoodItems { get; set; }
    public DbSet<LogEntry> LogEntries { get; set; }
    public DbSet<MealType> MealTypes { get; set; }
    public DbSet<User> Users { get; set; }
    public DbSet<UserWeight> UserWeights { get; set; }

    protected override void OnModelCreating(DbModelBuilder modelBuilder)
    {
        modelBuilder.Conventions.Remove<PluralizingTableNameConvention>();
    }
}
Now, rerun the application by pressing F5, and Entity Framework says… “Not so fast, my friend!”
Dropping and Recreating the Database
By default, Entity Framework will not drop and recreate your database when you make changes to code that affects the generation of the model. Not accidentally deleting your database is generally a good thing; though in our case, we really do want to drop and recreate the database. To specify this, we add a call to the Database.SetInitializer() method, in the constructor of our Repository class:
public class Repository : IDisposable
{
    private Context _context;

    public Repository(bool dropAndCreateDatabaseIfModelChanges = false)
    {
        if (dropAndCreateDatabaseIfModelChanges)
            Database.SetInitializer<Context>(
                new DropCreateDatabaseIfModelChanges<Context>());

        _context = new Context();
    }

    public List<User> GetUsers()
    {
        return _context.Users.ToList();
    }
    public void AddUser(User user)
    {
        _context.Users.Add(user);
        _context.SaveChanges();
    }

    // TODO write other queries

    public void Dispose()
    {
        _context.Dispose();
    }
}
Notice that I also update the constructor with a default parameter that allows the caller to specify if the database should be dropped and created when the model changes. Because I defaulted the parameter to “false”, we need to update the Program class to pass “true” in, like this:
class Program
{
    static void Main(string[] args)
    {
        var repository = new Repository(true);

        repository.AddUser(new User()
        {
            Username = "user1",
            Name = "John Smith",
            Email = "john@smith.com"
        });
        repository.AddUser(new User()
        {
            Username = "user2",
            Name = "Jane Doe",
            Email = "jane@doe.com"
        });

        var users = repository.GetUsers();
        users.ForEach(u => Console.WriteLine("UserID: {0}", u.UserID));
        Console.WriteLine("Number of Users: {0}", users.Count);

        Console.WriteLine("Press Enter to continue");
        Console.Read();
    }
}
Now, rerun the application by pressing F5, and your database will be dropped and recreated, this time using the singular form of your entity class names for the table names:
Overriding Column Conventions
We’re almost there! Entity Framework Code First does a reasonable job of mapping .NET data types to SQL Server data types, but for string and decimal properties, some specificity is required. For string properties, the model builder will default to using a nullable nvarchar(max) column. For decimal properties, the model builder will default to using a decimal(18,2) column. To refine the data types, we’ll use the DbModelBuilder’s Entity{EntityType}() method, which registers an entity as part of the model and returns an object that exposes a fluent API that allows us to configure the entity. Specifically, we’ll use the HasMaxLength() and IsRequired() methods to specify the length and nullability for the string properties, and the HasPrecision() method to specify the precision and scale for the decimal properties.
Here’s the updated Context class with the all of the necessary model refinements:
internal class Context : DbContext
{
    public Context() : base("name=CalorieCounterContext")
    {
    }

    public DbSet<DailyTarget> DailyTargets { get; set; }
    public DbSet<FoodItem> FoodItems { get; set; }
    public DbSet<LogEntry> LogEntries { get; set; }
    public DbSet<MealType> MealTypes { get; set; }
    public DbSet<User> Users { get; set; }
    public DbSet<UserWeight> UserWeights { get; set; }

    protected override void OnModelCreating(DbModelBuilder modelBuilder)
    {
        modelBuilder.Conventions.Remove<PluralizingTableNameConvention>();

        var foodItemEntity = modelBuilder.Entity<FoodItem>();
        foodItemEntity.Property(fi => fi.Name).HasMaxLength(50).IsRequired();
        foodItemEntity.Property(fi => fi.ServingSize).HasMaxLength(100).IsRequired();

        var logEntryFoodItemEntity = modelBuilder.Entity<LogEntryFoodItem>();
        logEntryFoodItemEntity.Property(lefi => lefi.Serving).HasPrecision(3, 1);

        var mealTypeEntity = modelBuilder.Entity<MealType>();
        mealTypeEntity.Property(mt => mt.Name).HasMaxLength(50).IsRequired();

        var userEntity = modelBuilder.Entity<User>();
        userEntity.Property(u => u.Username).HasMaxLength(20).IsRequired();
        userEntity.Property(u => u.Name).HasMaxLength(50).IsRequired();
        userEntity.Property(u => u.Email).HasMaxLength(255).IsRequired();

        var userWeight = modelBuilder.Entity<UserWeight>();
        userWeight.Property(uw => uw.Weight).HasPrecision(4, 1);
    }
}
Relationships
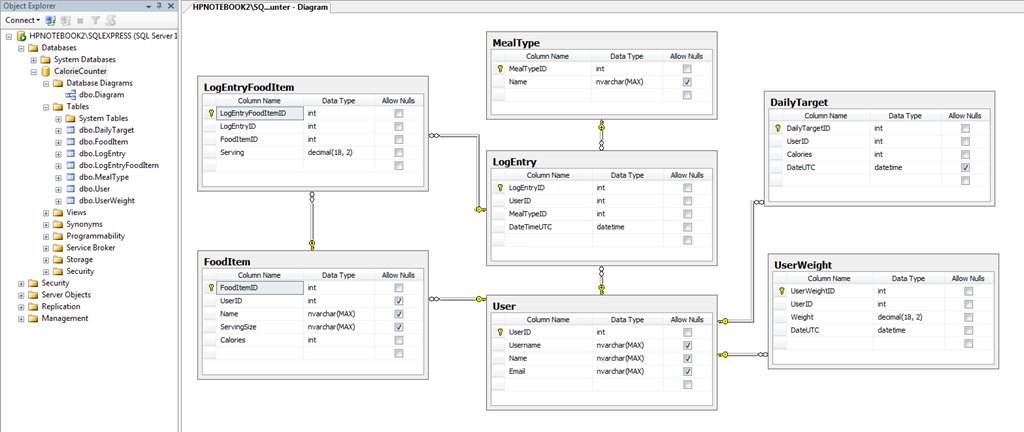
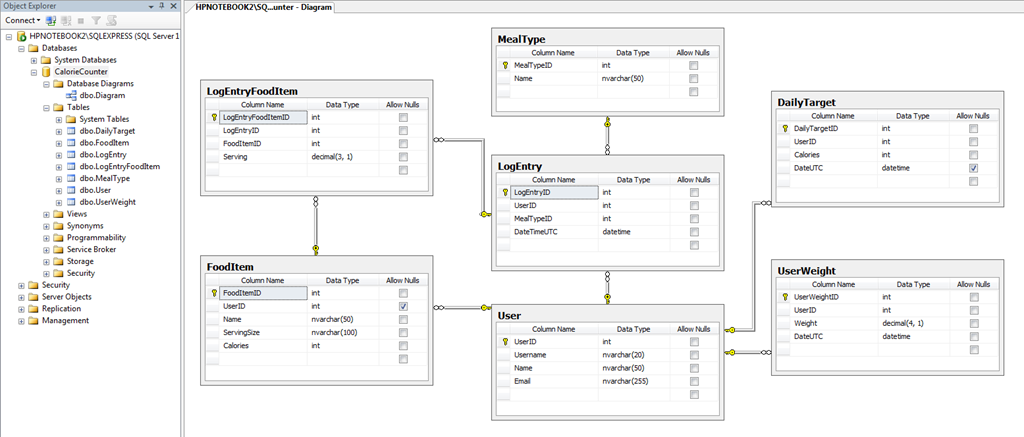
Code First had no difficulty correctly setting up the necessary database columns and foreign keys for our entity relationships. This was due to the fact that our entity classes closely followed all of the necessary conventions for “many-to-one” relationships, including setting up foreign key and navigation properties for the “one” side of the relationships and collection properties for the “many” side of the relationships. While specifying both foreign key and navigation properties is not strictly necessary, the foreign key property gives us a convenient way to specify whether or not the relationship is required or not (by the nullability of the entity property itself). Code First can handle “many-to-many” and “one-to-one” relationships as well, but our model currently does not require either.
Here’s a diagram of our completed database:
Next Steps
Our first pass at the database model has shaped up nicely. It’s far from perfect though. Food items should be composable (i.e. a food item can be made up from a collection of other food items) and meal types would probably work best as an enumeration. It would also be great to seed our database with some test data. Finally, we have work to do on our Repository, which is woefully incomplete at this point and not very testable. Future blog posts will address all of these shortcomings (and more).
For those wanting to take a deeper look at Code First, Julia Lerman has written two great books that are must reads: Programming Entity Framework: Code First and Programming Entity Framework: DbContext.
Entity Framework Code First provides developers with an efficient, flexible, and powerful framework for building out an application’s data layer. It’s not a substitute for knowing the ins-and-outs of SQL Server database development. When things go wrong, you’ll need those skills to arrive at a solution.
A complete copy of the source code for this blog post can be downloaded from GitHub at https://github.com/smashdevcode/calorie-counter-data-layer.