If you are unfamiliar with Entity Framework Code First work flows, please see my previous blog post: Jumpstart Development with Entity Framework Code First.
When Code First was initially released as part of Entity Framework 4.1, it lacked built-in support for migrating data when making changes to your Data Model. Updating your Data Model meant that you had to drop and recreate your database. While this approach worked for new projects, it wasn’t a reasonable solution for projects that had been released into production.
Code First Migrations, introduced as part of Entity Framework 4.3.1 (released on February 29, 2012), is Microsoft’s solution to that problem. Just like how Code First allows us to express our Data Model in code, Code First Migrations allows us to express our data migrations… in code. Each migration is represented by a class that inherits from the DbMigration abstract base class (part of the System.Data.Entity.Migrations namespace). Because of this, a history of your project’s data migrations will naturally be included as part of your project and therefore stored in source control. Additionally, Code First Migrations allow you to review how changes to your model will affect your database, before they are applied.
Let’s roll up our sleeves and see Code First Migrations in action.
Getting Started
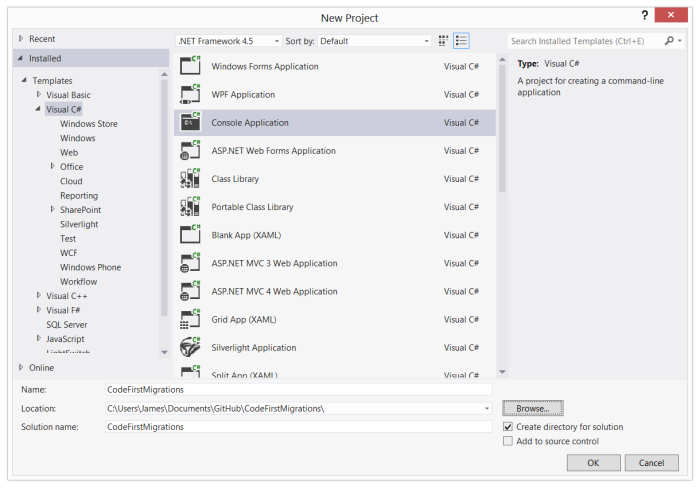
We’ll start by creating a new Console Application project. I’ll be using Visual Studio 2012 (Visual Studio 2010 will also work if you haven’t upgraded yet). From within Visual Studio, use the New Project dialog (select “File > New > Project…”) to setup a new Console Application project named “CodeFirstMigrations”.
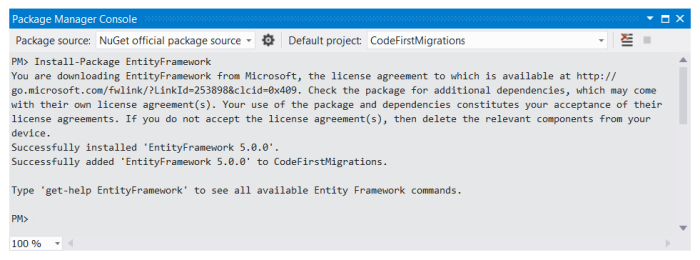
Now let’s add a reference to Entity Framework using the Package Manager Console (Tools > Library Package Manager > Package Manager Console). From the Package Manager Console command prompt, execute the command “Install-Package EntityFramework”.
Our Data Model will initially only contain two entities: Order and OrderItem. To keep things simple, let’s just add our entity and Context classes directly within the Program.cs file. We’ll also update the Program.Main() static method to instantiate an instance of our Context class, retrieve a list of Orders, and write that list to the Console. Notice that we are overriding the ToString() method on the Order entity class in order to pretty print order details to the Console.
Here’s the updated contents of the Program.cs file:
public class Program
{
    public static void Main(string[] args)
    {
        var context = new Context();
        var orders = context.Orders
            .Include(o => o.Items)
            .ToList();

        foreach (var order in orders)
            Console.WriteLine(order.ToString());

        Console.WriteLine("Press Enter to continue");
        Console.Read();
    }
}

public class Order
{
    public int OrderID { get; set; }
    public DateTime OrderedOn { get; set; }
    public List<OrderItem> Items { get; set; }

    public Order()
    {
        this.Items = new List<OrderItem>();
    }

    public override string ToString()
    {
        var sb = new StringBuilder();

        sb.AppendFormat("OrderID: {0}", this.OrderID);
        sb.AppendFormat("OrderedOn: {0}", this.OrderedOn);

        foreach (var orderItem in Items)
            sb.AppendFormat("OrderItemID: {0}, ItemNumber: {1}, Quantity: {2}, Price: {3:c2}\n",
                orderItem.OrderItemID, orderItem.ItemNumber, orderItem.Quantity, orderItem.Price);

        sb.AppendLine();

        return sb.ToString();
    }
}

public class OrderItem
{
    public int OrderItemID { get; set; }
    public int OrderID { get; set; }
    public Order Order { get; set; }
    public string ItemNumber { get; set; }
    public int Quantity { get; set; }
    public decimal Price { get; set; }
}

public class Context : DbContext
{
    public DbSet<Order> Orders { get; set; }

    protected override void OnModelCreating(DbModelBuilder modelBuilder)
    {
        modelBuilder.Conventions.Remove<PluralizingTableNameConvention>();
    }
}
Enabling Migrations
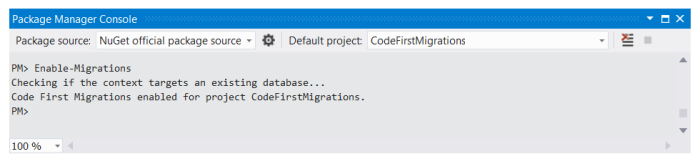
To enable Code First Migrations, open the Package Manager Console and execute the “Enable-Migrations” at the command prompt. This command will add a “Migrations” folder to your project. Enabling migrations only needs to be done once.
Within the Migrations folder you’ll find a Configuration class, whose Seed() method will allow us to add some test data to the database. Update the Seed() method to this:
protected override void Seed(CodeFirstMigrations.Context context)
{
    var order1 = new Order()
    {
        OrderID = 1,
        OrderedOn = new DateTime(2012, 10, 1, 8, 0, 0)
    };
    order1.Items.Add(new OrderItem()
    {
        OrderItemID = 1,
        Order = order1,
        ItemNumber = "Item1",
        Quantity = 1,
        Price = 10M
    });

    var order2 = new Order()
    {
        OrderID = 2,
        OrderedOn = new DateTime(2012, 10, 2, 10, 0, 0)
    };
    order2.Items.Add(new OrderItem()
    {
        OrderItemID = 2,
        Order = order2,
        ItemNumber = "Item1",
        Quantity = 2,
        Price = 10M
    });
    order2.Items.Add(new OrderItem()
    {
        OrderItemID = 3,
        Order = order2,
        ItemNumber = "Item2",
        Quantity = 1,
        Price = 20.5M
    });

    context.Orders.AddOrUpdate(order1);
    context.Orders.AddOrUpdate(order2);
}
Notice that we are explicitly setting the ID values for each of the entity instances. Doing so will allow the Context’s AddOrUpdate() extension method to successfully determine if the record already exists in the database or not. The Context’s SaveChanges() method will be called on our behalf, so there’s no need for us to call it directly.
Creating the Initial Migration
Now we’re ready to create the initial migration. To do so, we’ll use the Package Manager Console again, this time executing the “Add-Migration” command along with the name of the migration, “Initial”.
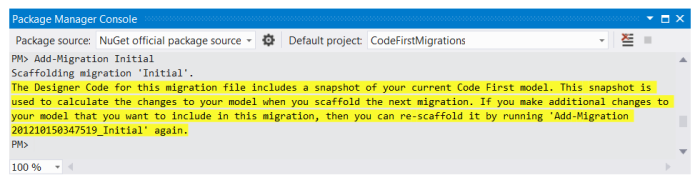
This command adds a class, named “Initial”, to the Migrations folder. The file name will be prefixed with a timestamp, ensuring that the migration classes will display in the correct chronological order. The class itself contains Up() and Down() methods: the Up() method contains the migration code for upgrading the database to this version of the model, while the Down() method contains the migration code for downgrading to the prior version.
Here’s the contents of the class:
public partial class Initial : DbMigration
{
    public override void Up()
    {
        CreateTable(
            "dbo.Order",
            c => new
                {
                    OrderID = c.Int(nullable: false, identity: true),
                    OrderedOn = c.DateTime(nullable: false),
                })
            .PrimaryKey(t => t.OrderID);

        CreateTable(
            "dbo.OrderItem",
            c => new
                {
                    OrderItemID = c.Int(nullable: false, identity: true),
                    OrderID = c.Int(nullable: false),
                    ItemNumber = c.String(nullable: false, maxLength: 100),
                    Quantity = c.Int(nullable: false),
                    Price = c.Decimal(nullable: false, precision: 18, scale: 2),
                })
            .PrimaryKey(t => t.OrderItemID)
            .ForeignKey("dbo.Order", t => t.OrderID, cascadeDelete: true)
            .Index(t => t.OrderID);
    }

    public override void Down()
    {
        DropIndex("dbo.OrderItem", new[] { "OrderID" });
        DropForeignKey("dbo.OrderItem", "OrderID", "dbo.Order");
        DropTable("dbo.OrderItem");
        DropTable("dbo.Order");
    }
}
For the most part, Code First Migrations will do a reasonable job of scaffolding the Up() and Down() methods, though some modifications will be necessary from time to time. For this migration, we needed to update the OrderItem.ItemNumber column definition to include “nullable” and “maxLength” arguments.
Updating the Database
Now we are ready to update the database, using the third and final Code First Migrations Package Manager Console command, “Update-Database”.

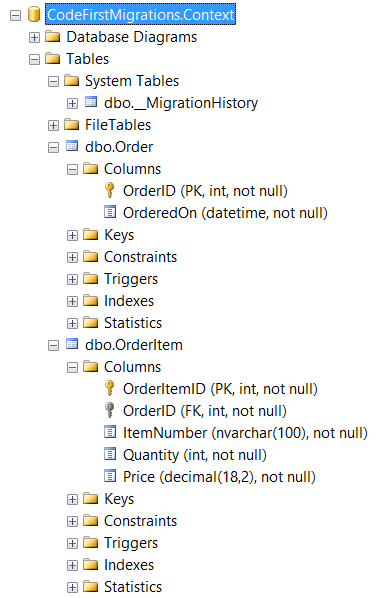
Notice that our Initial migration was applied and the Seed() method was ran. Here’s what our database tables look like from within SQL Server Management Studio:
Code First Migrations uses the “__MigrationHistory” system table to keep track of the database version. Currently, we only have a single row in the table:

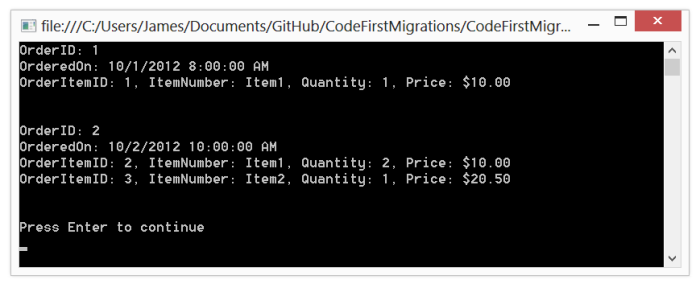
If we run the Console Application, here’s the output:
Making a Model Change
Let’s make a change to the model. Storing the item number as a string in the OrderItem entity is not a great choice, so let’s setup an Item entity. We’ll also replace the OrderItem.ItemNumber string based property with an Item entity based property. This change will also require us to make minor modifications to the Order.ToString() method override and the Program.Main() method.
Here’s the updated Program.cs file:
public class Program
{
    public static void Main(string[] args)
    {
        var context = new Context();
        var orders = context.Orders
            .Include(o => o.Items.Select(oi => oi.Item))
            .ToList();

        foreach (var order in orders)
            Console.WriteLine(order.ToString());

        Console.WriteLine("Press Enter to continue");
        Console.Read();
    }
}

public class Item
{
    public int ItemID { get; set; }
    public string ItemNumber { get; set; }
}

public class Order
{
    public int OrderID { get; set; }
    public DateTime OrderedOn { get; set; }
    public List<OrderItem> Items { get; set; }

    public Order()
    {
        this.Items = new List<OrderItem>();
    }

    public override string ToString()
    {
        var sb = new StringBuilder();

        sb.AppendFormat("OrderID: {0}", this.OrderID);
        sb.AppendFormat("OrderedOn: {0}", this.OrderedOn);

        foreach (var orderItem in Items)
            sb.AppendFormat("OrderItemID: {0}, ItemNumber: {1}, Quantity: {2}, Price: {3:c2}\n",
                orderItem.OrderItemID, orderItem.Item.ItemNumber, orderItem.Quantity, orderItem.Price);

        sb.AppendLine();

        return sb.ToString();
    }
}

public class OrderItem
{
    public int OrderItemID { get; set; }
    public int OrderID { get; set; }
    public Order Order { get; set; }
    public int ItemID { get; set; }
    public Item Item { get; set; }
    public int Quantity { get; set; }
    public decimal Price { get; set; }
}

public class Context : DbContext
{
    public DbSet<Order> Orders { get; set; }

    protected override void OnModelCreating(DbModelBuilder modelBuilder)
    {
        modelBuilder.Conventions.Remove<PluralizingTableNameConvention>();
    }
}
The Configuration class Seed() method will also need to be updated.
protected override void Seed(CodeFirstMigrations.Context context)
{
    var item1 = new Item() { ItemID = 1, ItemNumber = "Item1" };
    var item2 = new Item() { ItemID = 2, ItemNumber = "Item2" };

    var order1 = new Order()
    {
        OrderID = 1,
        OrderedOn = new DateTime(2012, 10, 1, 8, 0, 0)
    };
    order1.Items.Add(new OrderItem()
    {
        OrderItemID = 1,
        Order = order1,
        Item = item1,
        Quantity = 1,
        Price = 10M
    });

    var order2 = new Order()
    {
        OrderID = 2,
        OrderedOn = new DateTime(2012, 10, 2, 10, 0, 0)
    };
    order2.Items.Add(new OrderItem()
    {
        OrderItemID = 2,
        Order = order2,
        Item = item1,
        Quantity = 2,
        Price = 10M
    });
    order2.Items.Add(new OrderItem()
    {
        OrderItemID = 3,
        Order = order2,
        Item = item2,
        Quantity = 1,
        Price = 20.5M
    });

    context.Orders.AddOrUpdate(order1);
    context.Orders.AddOrUpdate(order2);
}
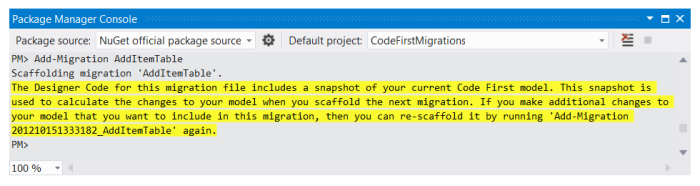
Now we are ready to scaffold the migration. To do so, we execute the “Add-Migration” command again using the Package Manager Console, this time using the name “AddItemTable”.
Modifying the Migration
We’ll need to make some modifications to this migration in order to for it to successfully complete. Here’s a breakdown of what we want to do:
Up() Method
- Add “nullable” and “maxlength” arguments to the Item.ItemNumber column
- Create a unique index on the Item.ItemNumbember column
- Populate the Item table with a list of distinct OrderItem.ItemNumber value
- Update the OrderItem.ItemID values
Down() Method
- Add “nullable” and “maxlength” arguments to the OrderItem.ItemNumber column
- Update the OrderItem.ItemNumber column
- Drop the unique index on the Item.ItemNumber column
Here’s the updated contents of the migration class:
public partial class AddItemTable : DbMigration
{
    public override void Up()
    {
        CreateTable(
            "dbo.Item",
            c => new
                {
                    ItemID = c.Int(nullable: false, identity: true),
                    ItemNumber = c.String(nullable: false, maxLength: 100),
                })
            .PrimaryKey(t => t.ItemID);
        CreateIndex("dbo.Item", "ItemNumber", true);

        // populate the Item table
        Sql(@"
            insert Item (ItemNumber)
            select distinct ItemNumber
            from OrderItem
            order by ItemNumber
        ");

        AddColumn("dbo.OrderItem", "ItemID", c => c.Int(nullable: false));

        // update the OrderItem.ItemID column
        Sql(@"
            update oi
            set oi.ItemID = i.ItemID
            from OrderItem oi
            join Item i on i.ItemNumber = oi.ItemNumber
        ");

        AddForeignKey("dbo.OrderItem", "ItemID", "dbo.Item", "ItemID", cascadeDelete: true);
        CreateIndex("dbo.OrderItem", "ItemID");
        DropColumn("dbo.OrderItem", "ItemNumber");
    }

    public override void Down()
    {
        AddColumn("dbo.OrderItem", "ItemNumber", c => c.String(nullable: false, maxLength: 100));

        // update the OrderItem.ItemNumber column
        Sql(@"
            update oi
            set oi.ItemNumber = i.ItemNumber
            from OrderItem oi
            join Item i on i.ItemID = oi.ItemID
        ");

        DropIndex("dbo.OrderItem", new[] { "ItemID" });
        DropForeignKey("dbo.OrderItem", "ItemID", "dbo.Item");
        DropColumn("dbo.OrderItem", "ItemID");
        DropIndex("dbo.Item", new[] { "ItemNumber" });
        DropTable("dbo.Item");
    }
}
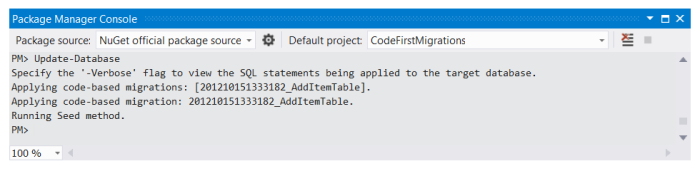
Updating the Database
Now we’re ready to update the database. Simply execute the “Update-Database” command at the Package Manager Console prompt:
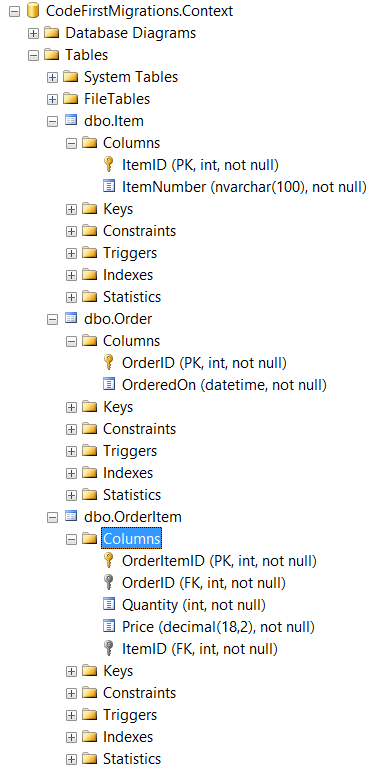
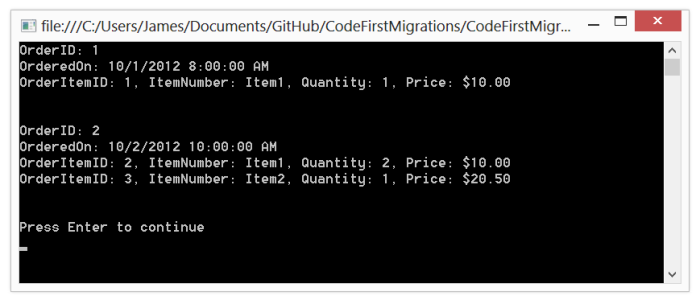
Here are updated looks at the database tables, the contents of the “__MigrationHistory” table, and the Console Application’s output:

Downgrading the Database
With Code First Migrations, we can just as easily downgrade a database as we can upgrade it. To do so, just execute the “Update-Database” command while specifying the “-TargetMigration” parameter.
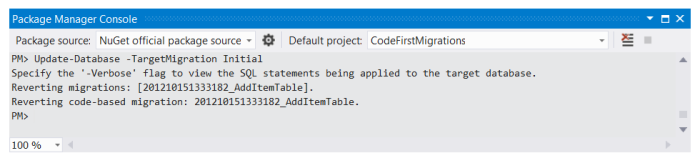
With the “AddItemTable” migration successfully reverted, our database is now back at our initial state (as specified by the “Initial” migration).
Deployment Options
When it comes time to deploy your application into production, you have a couple of options for handling your Code First Migrations. First, you can set a database initializer so that all pending migrations are applied when the application starts up. For our Console Application, we just need to add the following line of code to the beginning of the Program.Main() method:
Database.SetInitializer(new MigrateDatabaseToLatestVersion<Context, CodeFirstMigrations.Migrations.Configuration>());
Code First Migrations also allows you to generate a SQL script for the pending migrations. Just include the “-Script” parameter switch when executing the “Update-Database” Package Manager Console command, and Code First Migrations will generate and display a SQL script in Visual Studio. From there you can review the script, save it to disk, deliver it to your DBA, or execute it yourself against the production database.
Code First Migrations also work seamlessly with Windows Azure Web Sites. When publishing your site, just make sure that you’ve checked the “Execute Code First Migrations” check box listed underneath your database’s section within the Publish Web dialog’s Settings tab. When your web site starts up, all pending migrations will be applied to the site’s database.
Additional Resources
Additional information can be found on Microsoft’s MSDN Data Developer Center web site at:
http://msdn.microsoft.com/en-US/data/jj591621
http://msdn.microsoft.com/en-us/data/jj193542.aspx
A complete copy of the source code for this blog post can be downloaded from GitHub at https://github.com/smashdevcode/code-first-migrations.